

Project JASPER: Scary Lego
Part 4: Five hours and four swearstorms


I’m building a budget (well, budget-friendly) PC that will run SteamOS and perform comparably to a console like a PS5 or an Xbox Series X. And now it's time to actually put it together.
Before we dive in, let me just acknowledge that this part is really long. I know I’ve overwritten, but I wanted to document both the thought processes and the actions (inept or not).
Here’s the thing: building a computer feels more intimidating than it actually is. This entire build required exactly one (1) Phillips-head screwdriver and one evening. If I can pull this off, anyone can. The other side of that, though, is that it’s also a pain in the ass. Anyone can build a computer, but building one as cheaply as possible is going to hit weird snags and I want to make those clear.
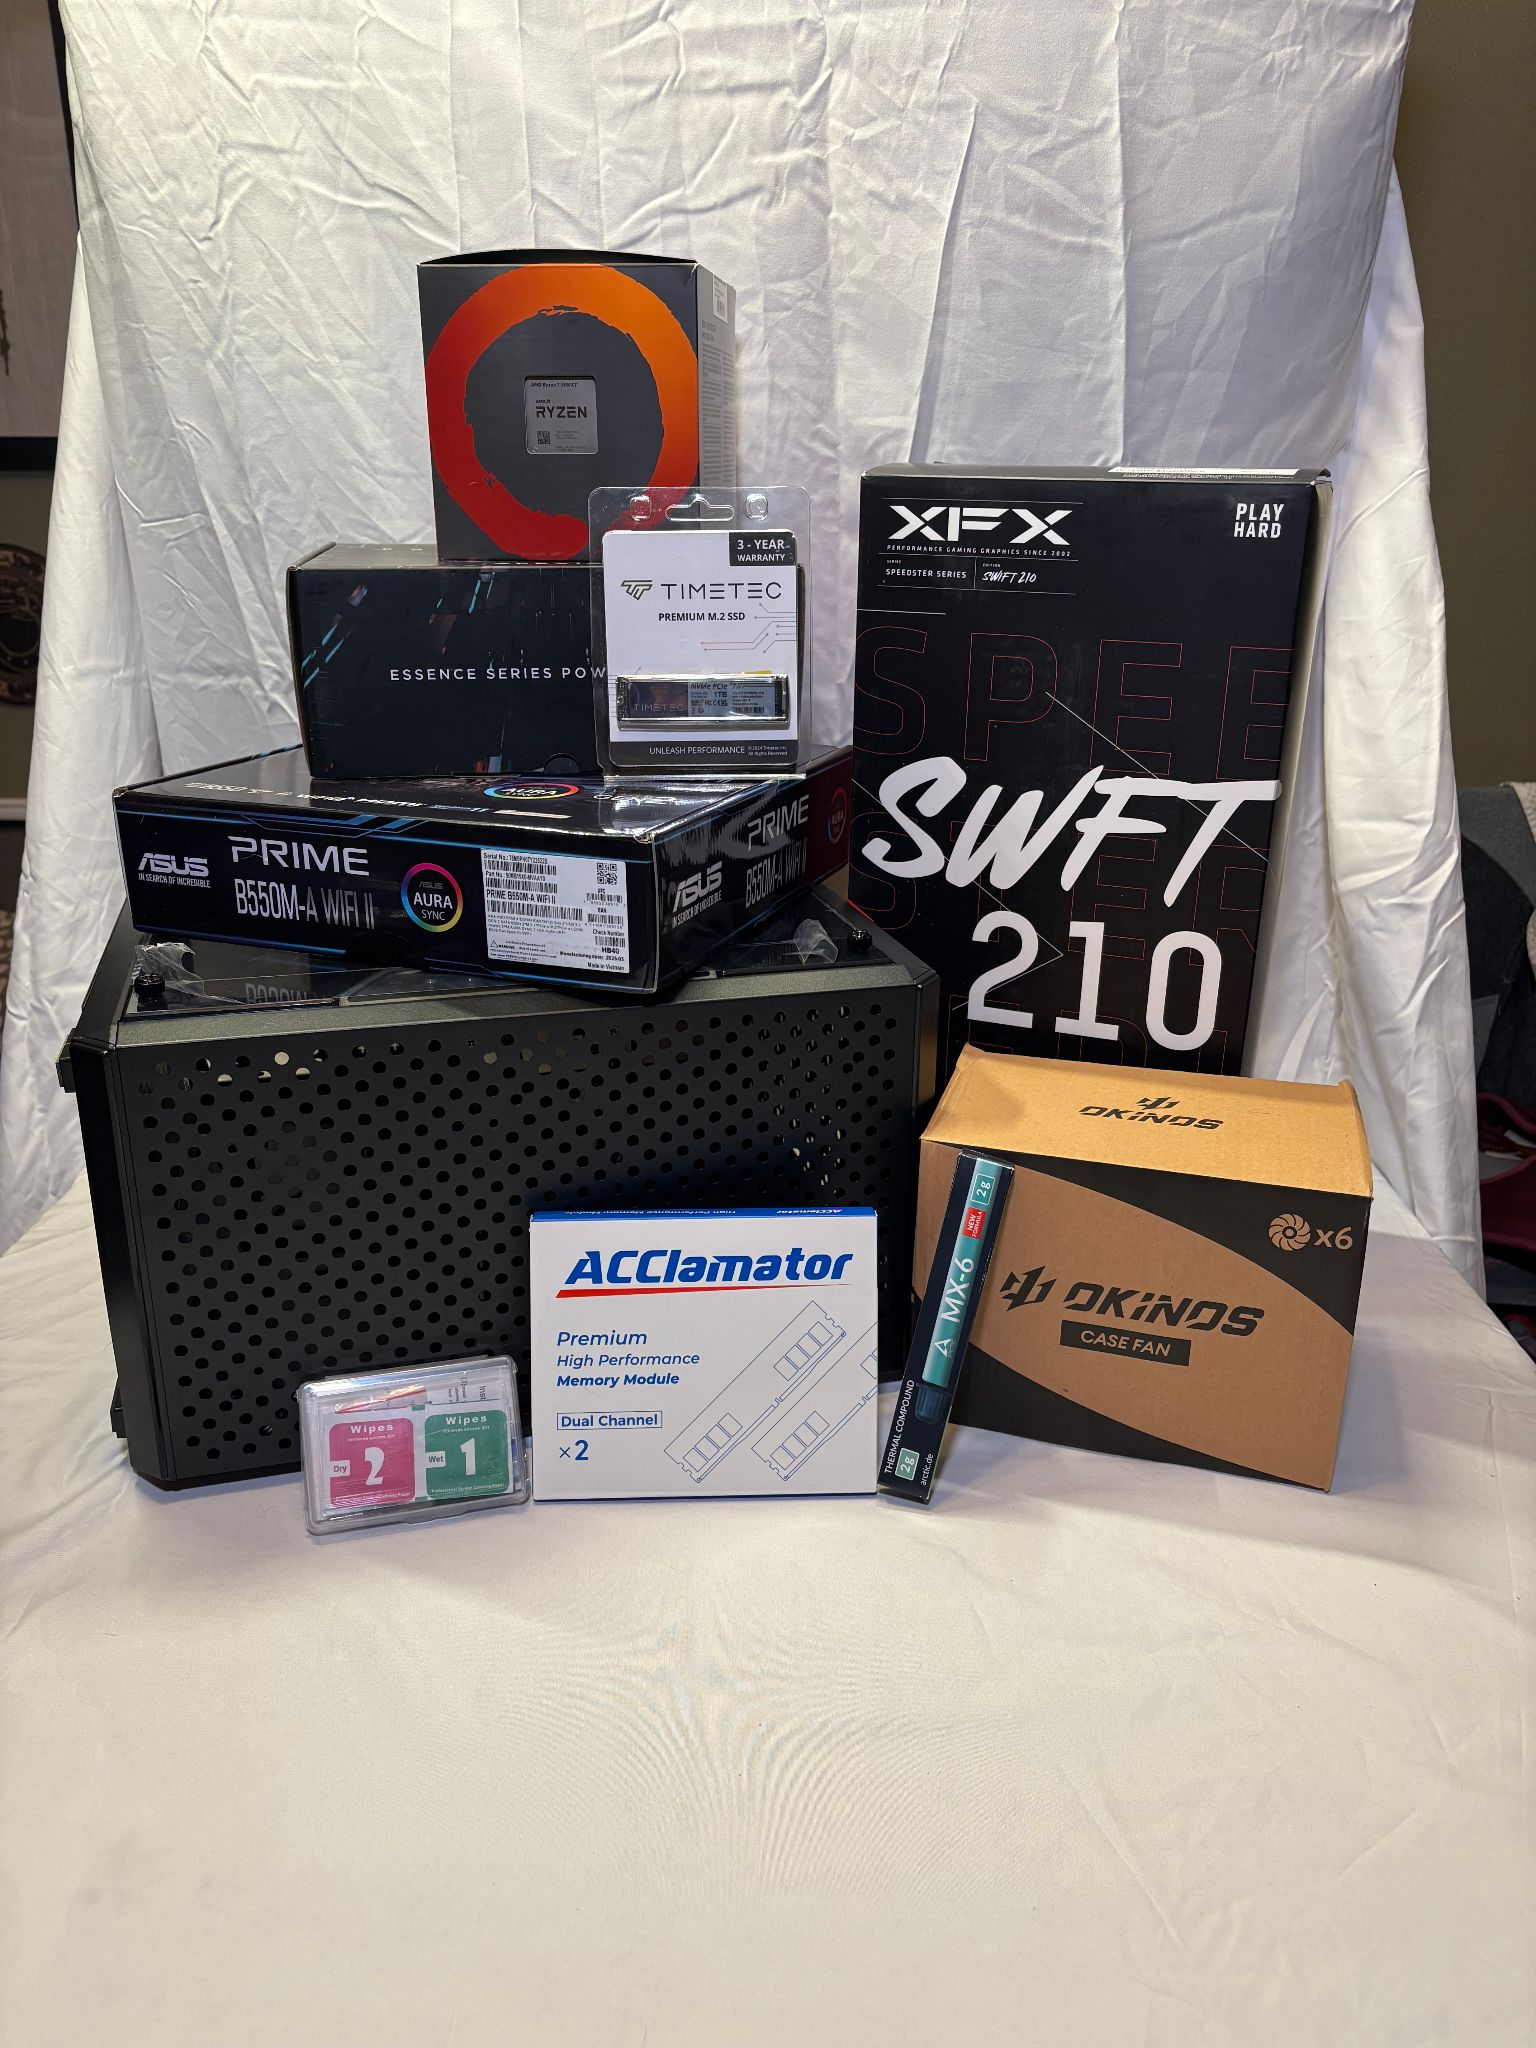
Having already stretched my attention span to its limit waiting three whole days for deliveries, I finally had everything in hand.
Well, not everything.
Rufus owes me thermal paste
Thermal paste is a goo that goes between the CPU and its heatsink — in this case, the gigantic AMD Wraith fan thing — to help with moving hot from the chip to the air.
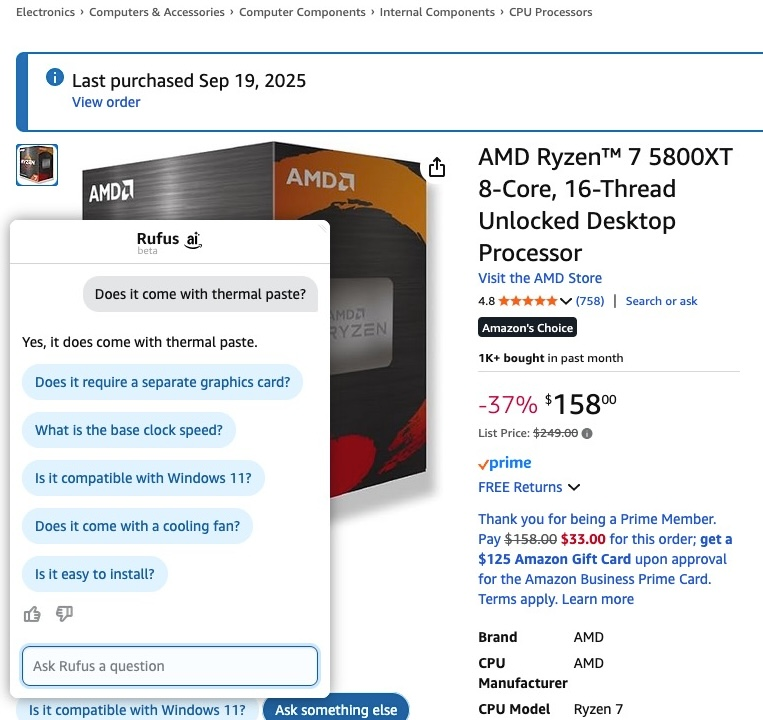
I was vaguely aware that I’d need thermal paste even if I was kind of shaky on the details. In the Amazon listing, clicking on the “Does it come with thermal paste?” link below the picture pulls up a chat with Amazon’s Rufus AI. (To be clear, I did not realize at the time that was what would happen.) Rufus immediately chimed in with a helpful, “Yes it does come with thermal paste.”
Dear reader, it does not come with thermal paste. And let me here reiterate a firm stance of Rogue.site: Fuck AI. Fuck AI for any number of reasons, not the least of which is that Rufus now owes me $6.
So I had to order some thermal paste. When I checked out, Amazon also suggested an SSD heatsink for $6, so why the hell not? Tack another $12 onto the total.
A man, a plan, a canal, JASPER
An aside before we start: I’m writing the outline and a lot of the background information before I start putting the machine together. There’s probably going to be notes from Planning Jeff to Building Jeff periodically, and please forgive any weird tense shifts.
I realized last week I’d need a plan for this because there’s too many moving pieces and my brain is basically Swiss cheese (I’d like to blame COVID, but it’s just as much age and undiagnosed ADHD, and, at this point, is probably better considered a feature than a bug).
I know I want to do the fans first. They go around the outside and if I get them in, I don’t have to worry about maneuvering them around the rest of the parts. The fans need to plug into their hub, and the hub needs to plug into the motherboard. So let’s start there.
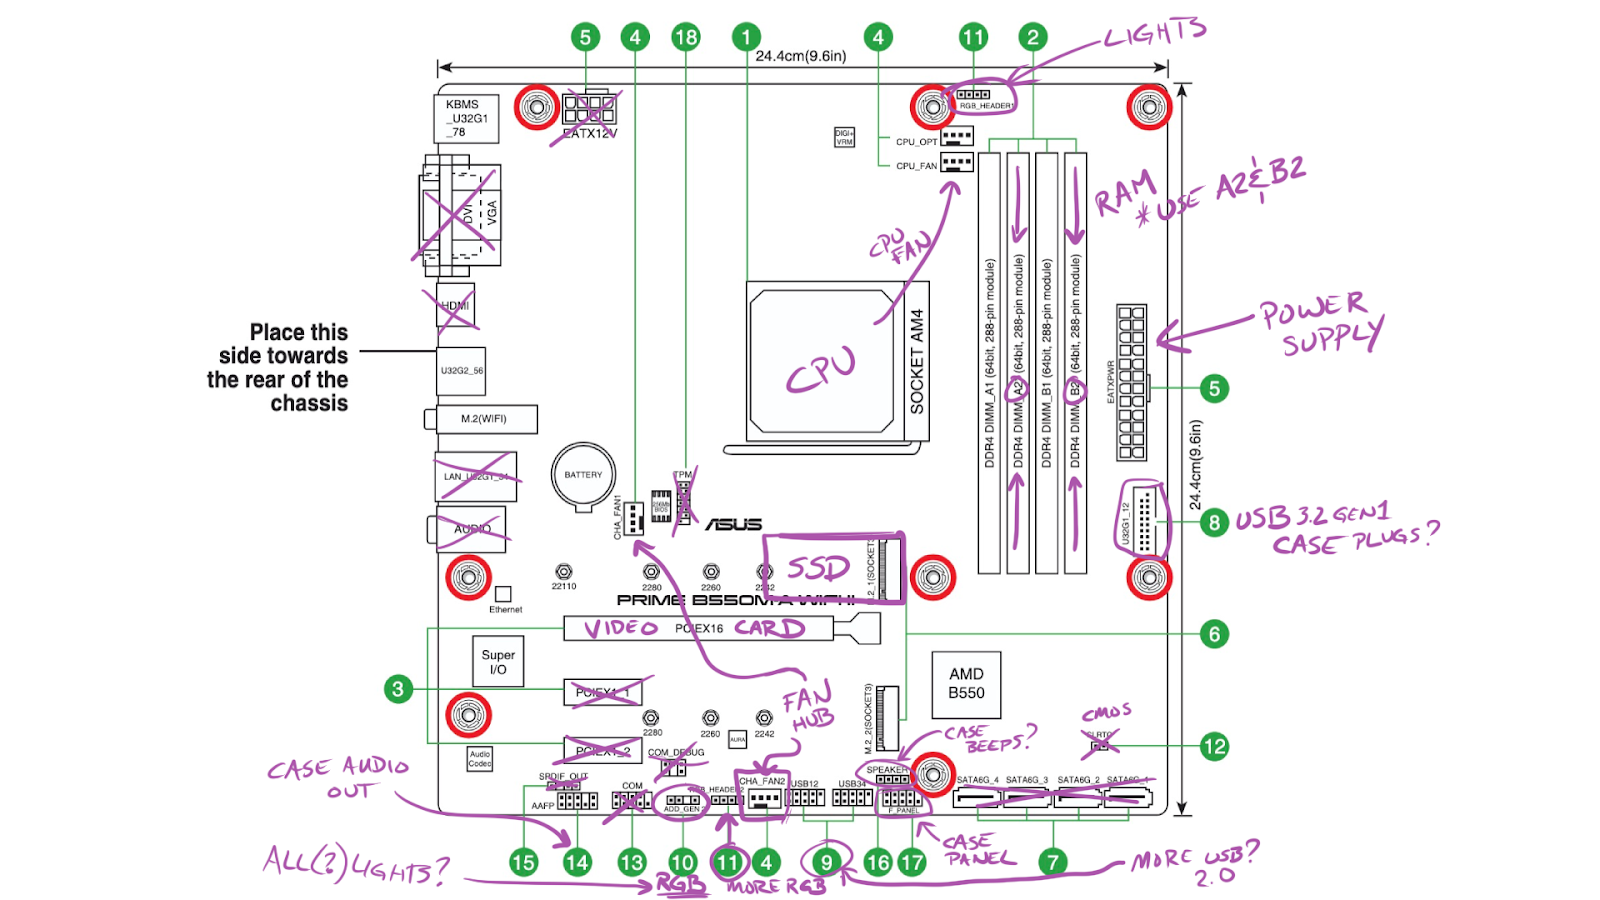
This mess is the motherboard. I crossed out everything I won’t be using, and I noted (for me more than you) the headers and sockets I'll need. To answer my question about the fan hub, it’s marked as #4 about midway across the bottom — and there’s an RGB header for the fan lights right next to it. [Future Jeff: You might note that I have that #5 in the top left crossed out. That’s because I didn’t yet realize the CPU has its own necessary power cable.]
With the fans in, I think it makes sense to get the power supply installed next. It’s the other piece that’s tied directly to the case and I want it out of the way. I only need two cables from it [Future Jeff: wrong!] — the big, non-removable, 20+4-pin ATX power cable and one SATA for the fan hub — this is why we chose a semi-modular supply. The ATX cable needs to run all the way to the front of the motherboard (#5 in the drawing) and the SATA just needs to reach the hub on the back side.
Next, I need to install the stupid, impulse-purchase heatsink on the SSD and then install the SSD on the motherboard. I want to get that on early to see if I run into any clearance issues. I’m plugging it into the M.2-1 socket (#6 above) between the video card and the CPU. It should be clear there. I can do this outside of the case before I install the motherboard.
Then it’s time to get the CPU seated and its heatsink installed. I’m a little worried about moving the motherboard around too much after it’s on — the fan is just shy of four inches across and heavy — but I want to do this before the motherboard is in the case so I can see what I’m doing better.
After that, it’s time to get the motherboard installed in the case. And then I can start running some (all?) of the wires. (Note to self: label all of the case’s front panel wires.)
Then I’m going to do the RAM — this is the one step of this process I’ve actually done before.
And finally, the video card. This should be as simple [Future Jeff: “Simple”] as plugging it in and tightening a screw, but I do have to punch out a panel on the back of the case.
Project JASPER and the Case of the Case
Let’s talk about the case for a minute. It’s gigantic. This thing is bigger than the PS5 and Xbox Series X put together. I hate it.