

FBC: Firebreak beginner’s guide
In this Big Friendly Guide, we’ll walk you through some critical beginner tips for FBC: Firebreak so that you and your friends can effectively clean out the bowels of The Oldest House.


FBC: Firebreak is a multiplayer horde game — think Left 4 Dead, but with some Helldivers mixed in — that takes place in the same universe as Remedy's Control. In addition to fighting the Hiss enemies, you’ll also need to battle giant furnaces, post-it note golems, and sentient traffic lights.
In this Big Friendly Guide, we’ll walk you through some critical beginner tips for FBC: Firebreak so that you and your friends can effectively clean out the bowels of The Oldest House.
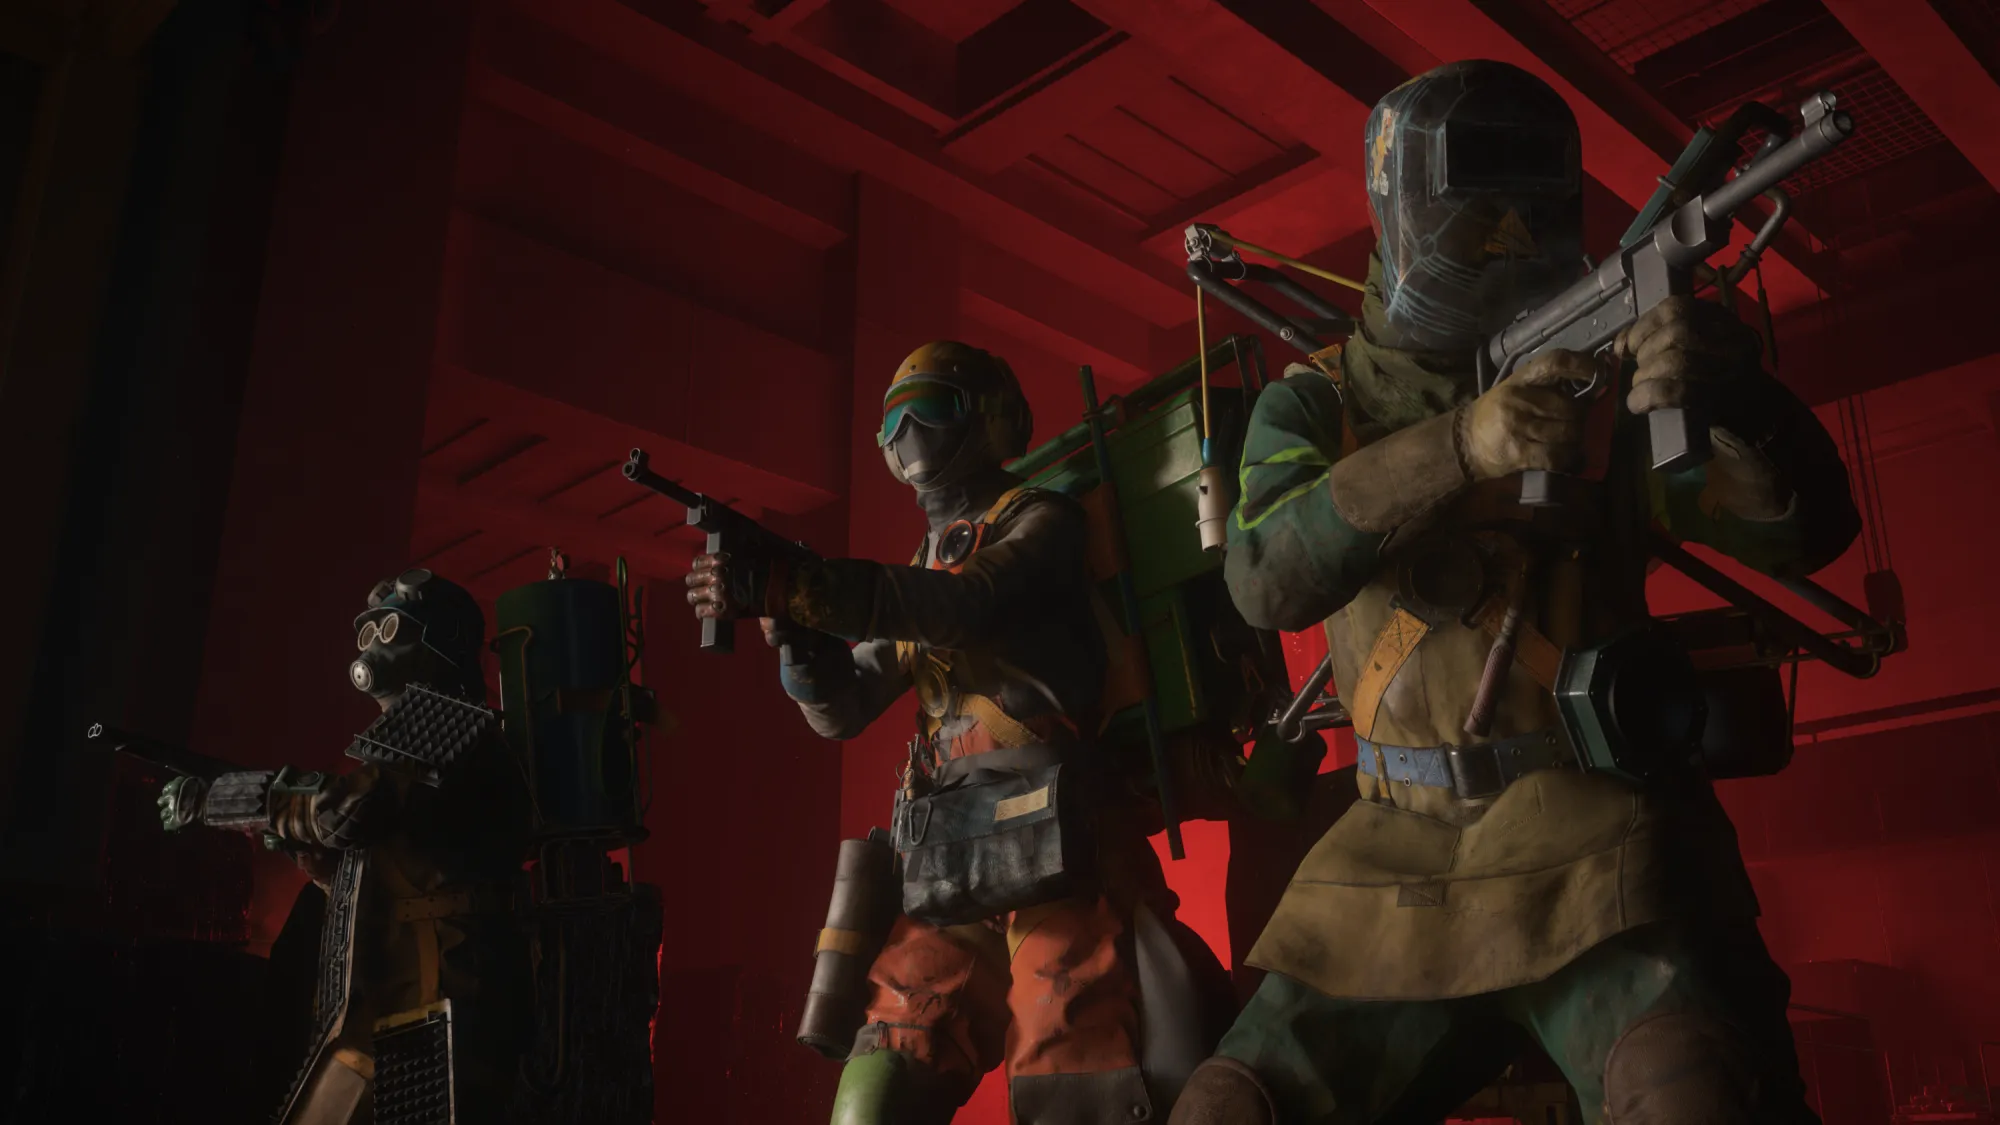
Three roles, three kits, one team
Firebreak has probably the clearest and best-implemented class mechanic where each role has a different play style (in specific circumstances). When you’re just putting bullets into baddies, everyone plays the same (which is a good thing).
But that’s not all that you’re doing in Firebreak. You’re also putting out fires, repairing showers, charging up heaters, and cleaning up post-it note apocalypses. The non-shooting parts are where the three roles come into their own.

There’s the Fix Kit, which wields a massive wrench that you can use to turn lights back, beat mechanical panels back into place, or smack enemies over the head. There’s the Jump Kit, which wields an electric rod that you can use to recharge generators, turn on hot water, or shock entire groups of Hiss. And there’s the Splash Kit, which wields a hydro-gatling gun that can douse fires, soak enemies, and remove status effects from yourself and allies.
Each of these kits bring something important to the team, and it’s ideal to have one of each while you’re playing. But all three kits level up separately, so you want to balance jumping between what your team needs and sticking with the job you want to upgrade.
Look for ways to stack effects
The abilities of the three team members can interact in really interesting ways. The water gun applies the wet effect. The jump gun applies the shock effect. If you apply shock to someone (or something) that’s already wet, the effect is stronger.
The wrench can’t apply any status effects without perks or its ultimate, but it can drop a massive cannon turret that can blow hiss away. If your allies set up a sweet stunning combo with their water and electricity, the wrench’s cannon could be the perfect finale.
Even without your allies, you can start to stack these effects within your own arsenal by unlocking new upgrades (more on this in a second), like pairing a Shock grenade with the hydro-gatling gun.
To unlock upgrades, you’ll need to find Lost Assets.
Pick up all the classified documents
Lost Assets are, basically, your in-game currency — you'll also see them called samples or classified documents, but they're all the same thing. You’ll get some just by completing jobs, but you’ll get a lot more by doing two things during the job — opening shelters and taking down strong, named enemies.
Shelters are saferooms that can be found in every level, and there are usually several of them (especially as you get into the higher-level jobs). They’re a place to get ammo, get a little healing, and, importantly for this section, find classified documents. They’ll just be laying out either on the desk, the racks where you find the ammo, or just out on the floor. There are also briefcases that give multiple classified documents. At the end of a run, those classified documents become Lost Assets.

Opening a shelter, though, summons a wave of Hiss. Sometimes, that wave will have a Strong Enemy inside. These are basically just normal Hiss, but with more health and a skull icon over their heads. You’ll see their name and health bar across the top of your screen when you engage with them.
When you defeat a Strong Enemy, they’ll explode into a shower of classified documents (and some ammo). Just be careful if you’re holding onto a bunch of classified documents or the much rarer job-specific resources, because ...
Dying drops all of your requisition materials
Death in FBC: Firebreak is pretty damn forgiving. Your team has several lives when you start the job, and you’ll only consume a life if nobody resurrects you when you go down (or you give up). You’ll then be teleported to a nearby shelter and your team will lose a life. You need to lose all of your lives (when you’re down to zero, you’ll regenerate a new life after a short timer) in order to actually fail the mission.
However, death has another cost that you’ll likely run into more often: dropped resources. If you fully respawn, you’ll drop all of the samples and classified documents you’re holding. This can be devastating to your progression through the game's research and requisition trees (more on that in a second). Thankfully, you can reclaim all of your resources by returning to where you died on the map and picking them all back up.
Research versus Requisition
You’ll spend your currency -- those Lost Assets -- between jobs by unlocking Requisitions and Research.

Requisitions are where you’ll unlock new cosmetics (and so many sprays) along with huge upgrades to your weapons.
Perks come from Research, and are level-gated. Perks are also much cheaper to research than most items in Requisitions — meaning they’re great for spending those last few Samples after you unlock something cool in Requisitions.
The trick is to never focus too much on one over the other. Perks can be extremely powerful, but you can only hold so many at a time, depending on your level. Getting to higher pages of gear on the Requisitions page also forces you to spend a lot of Lost Assets grabbing gear and weapons you might not use. Have an ideal Research and Requisition goal in mind and try to spend your resources accordingly.
Those rare resources
As you unlock more perks, you’ll probably start to notice that you can upgrade them with more Lost Assets and some specialty resources -- specialty resources that you might’ve never seen before. Each of these “sample” resources come from a specific job, and they’re very, very rare if you’re just using the game’s normal settings.

However, once you complete the different Clearance levels of each job, you’ll unlock the ability to increase your “Corruption.” Corruption causes Objects of Power to appear in the jobs as you’re playing, all of which give an odd boost to your enemies. A Riot Helmet might give your foes extra shields, for example, while a possessed snare drum might make all the Hiss move at 300% speed.
Using a Black Rock Launcher, you can defeat these evil items, clearing the buff they’re giving to enemies and netting you some of that level’s specific sample. Killing an Object of Power in Frequency Shift, for example, will net you at least two Resonant Globs.
While you're at it, Play Control
The final tip for this game is that you should play Control, if you haven’t or if it’s been a minute. Firebreak offers a first-person perspective instead of third-person, but the enemies, the Shelter doors, and just the design of the world are all clearly pulled from The Oldest House in Control.
If you enjoy Firebreak, it’s essentially just a side dish for the main course that is Control. But Firebreak also doesn’t spoil enough about Control’s main story to not make it worth getting into if Firebreak is your first adventure into this world.
The Ultimate Edition of Control (which comes with all the DLC) is down to $39.99 these days, and you should give it (and Remedy’s other games, like Alan Wake 2), a shot if you like what you see in Firebreak.


This post originally appeared on BigFriendly.Guide
Please pardon any formatting weirdness